
Creating an assistant
Set up your own assistant in Munia to save time on your routine tasks.
Updated on 6 mars 2026
Step 1 - Access assistant creation
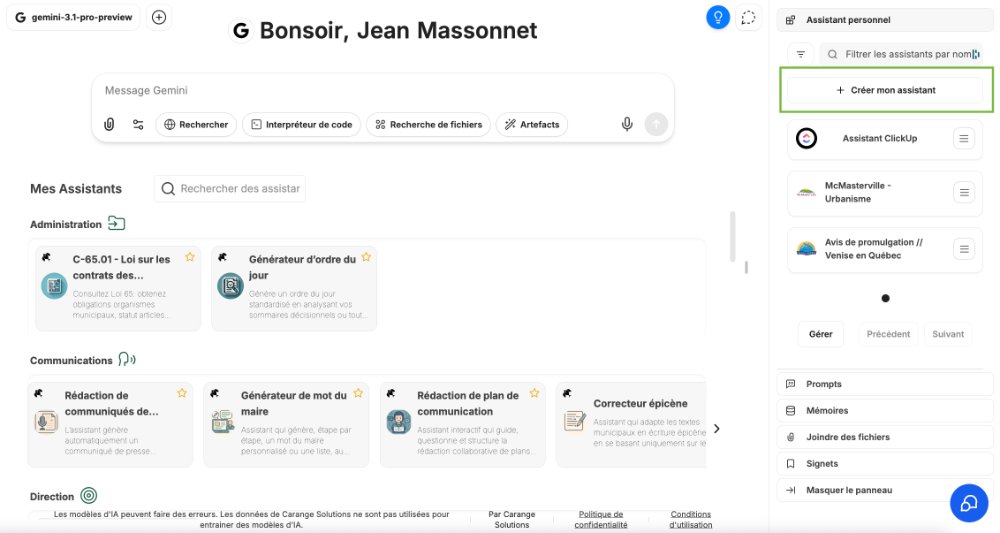
In the right-hand sidebar, click the "Personal assistant" button at the very top. You will see the list of assistants you have access to. Then click "Create my assistant".
Step 2 - Fill in the basic information
Give your assistant a name, choose a category (e.g. Communications) and write a description. This description goes along with the assistant's title and is particularly useful if you share it with colleagues, since it lets them quickly understand what it is for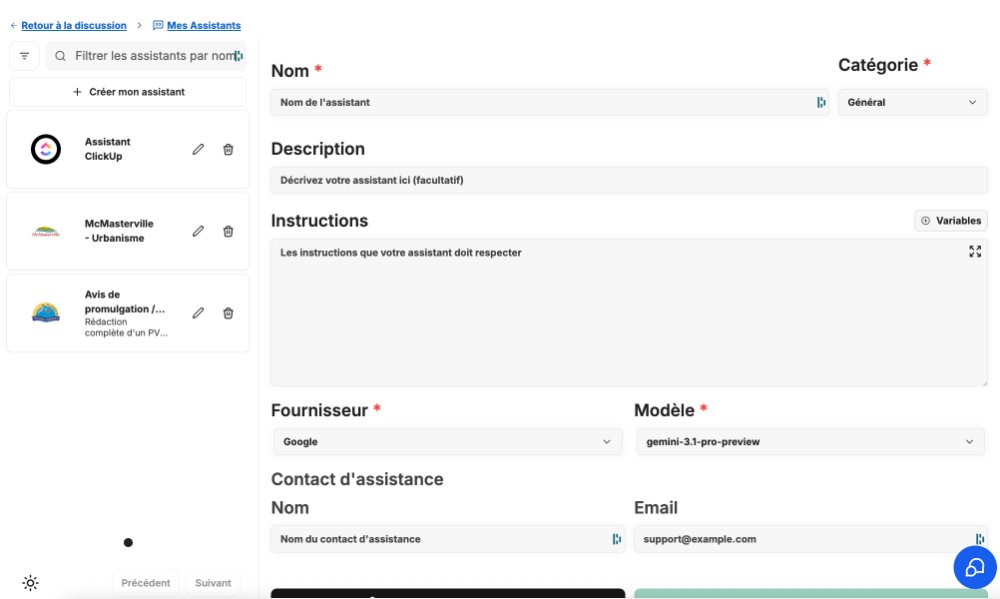
Step 3 - Write the assistant's instructions
This is where you define your assistant's behaviour. For the best results, structure your instructions in four parts:
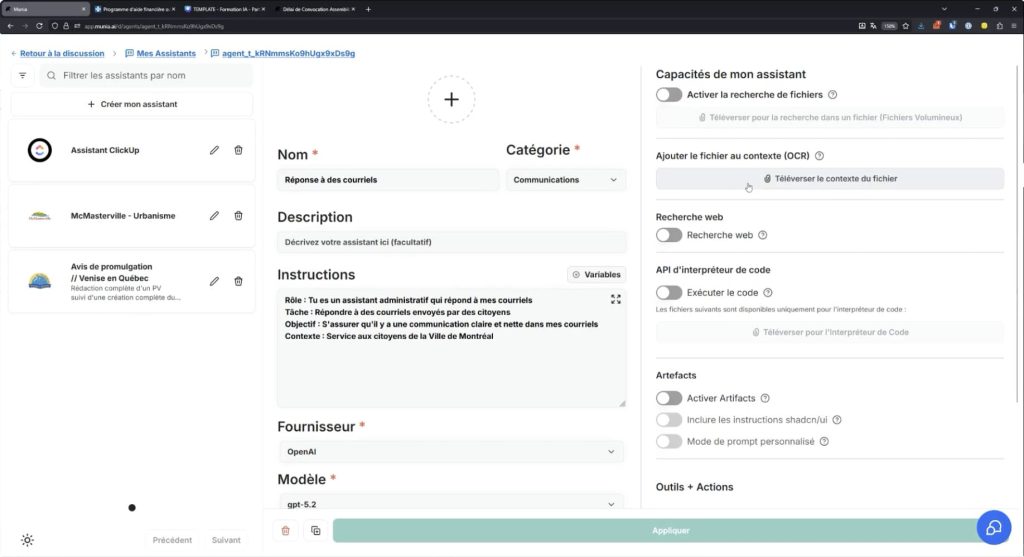
- Role: What is the assistant's role? (e.g. "You are an administrative assistant")
- Task: What must it do? (e.g. "Answer emails sent by citizens")
- Objective: What is the goal? (e.g. "Ensure clear communication in my emails")
- Context: What environment do you work in? (e.g. "I work in the citizen services department of the city of Montreal")
Step 4 - Choose an AI model and fill in the contact information
Select the AI model that will power your assistant according to your preference. Also fill in your name and your email address in the contact information. This lets colleagues who use the assistant know who created it.
Then click "Create my assistant".
Step 5 - Configure the advanced options
After creation, additional settings become available:
- Files: Upload documents that apply permanently to your assistant (e.g. email templates). If your files change with each use, do not upload them here.
- File search: Use this option for regulatory or documentary research within your documents.
- Web search: Allows the assistant to consult the internet in real time.
- Code interpreter: Enable this option if you want the assistant to generate files.
- Artifact: Useful for visualizing the creation of software in real time.
- Tools: Add image generation (Gemini Image Tools) or the calculator if your assistant has to perform calculations. By default, the assistant does not calculate.
- Actions: Allows Munia to communicate with other platforms such as Outlook. This feature requires permissions and IT expertise.
Step 6 - Configure assistant chains (optional)
You can link several assistants together in two ways:
- Assistant handoff: Your main assistant acts as a conductor and can delegate tasks to up to 10 sub-assistants.
- Assistant chain: Several assistants are consulted one after the other to process your request. You submit your request at the start and receive the final result, without seeing what happens between the steps. Make sure no intermediate validation is required, since the process is not visible.
Step 7 - Test and adjust your assistant
Click "Back to the conversation" at the top left. Your assistant will appear in the right-hand sidebar and in the directory under its category. Send it a message to test it.
If the result is not satisfactory, click the three-horizontal-bars button on your assistant, then click "Edit". Adjust the instructions and click "Apply". Then use the "Regenerate" button to see the effect of your changes.
It is perfectly normal to adjust an assistant several times before getting the result you want. The time invested in creating it will pay off every time you use it.
Good to know
Munia keeps a version history of your assistant. If you regret a change, you can go back to a previous version.